How To Lace Converse High Tops -7 Best Ways
How To Tie Converse High Tops- 7 Of The Best
You’ve just got your converse high tops fresh out of the box, chances are you’ll loosen the laces a bit – tied the factory standard way, and slip your feet straight in. There’s nothing wrong with that, after all converse high tops look great with practically anything. But how about doing something different with those laces? After all, the ability to lace your shoes in different styles could instantly switch up your look.
But where do you start?
If you’re used to tying your converse laces the standard way, doing anything different may seem a little daunting.
With this in mind, we’ve put together a short guide on how to lace converse high tops. None of the shoe lacing methods below are too difficult, and they make a great starting point. So impress yourself and your friends and try a few of them out!
How To Lace Converse High Tops – Shoelace Patterns Step By Step
Before we jump in, it’s worth noting that while this is specifically focused on lacing converse high tops, these methods are just some cool ways to lace shoes – so try them on your high tops or on any other footwear.
1. The Standard Lacing Method – Step By Step
Let’s begin with the standard type of lacing pattern shall we? Also called “Criss cross lacing” this is the most common method you’ll see. It’s also one of the easiest to learn and is a nice convenient way to tie your Converse high tops. When you use this method, the intertwining laces are so dense that once you get to the top, you don’t actually need to conclude with a knot.
When you use this method, the intertwining laces become so dense that, once you get to the top, you don’t actually need to conclude with a knot.
Step 1
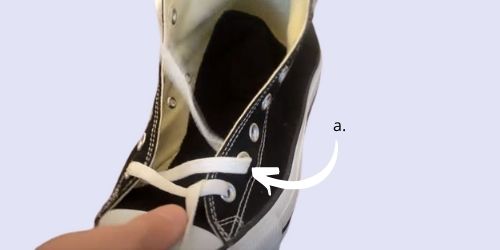
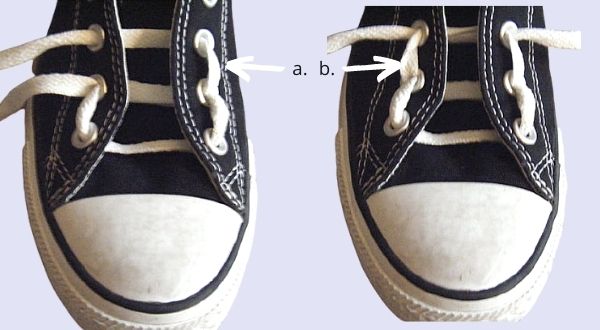
a.The first step is to take the aglets (plastic tube around the lace) and push them through the eyelets like the image above. Make sure the laces are straight and even.
b. Now take one side of the lace aglets and go over to the eyelet that is 3 up on the opposite side
Step 2
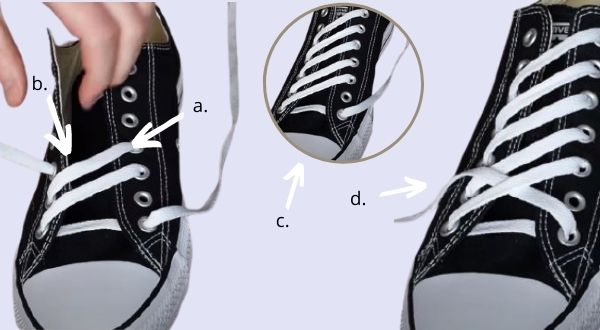
a. Push the lace up and into the eyelet right above it and pull through
b. Now go over and to the eyelet on the opposite side one down and pull the lace through. Then, just like before push the lace up into the eyelet just above it.
Step 3
a. Take one of the laces and push it down through the eyelet one below it, and do the same for the opposite lace
b. Do the same for the opposite lace, it should form a large X when done
Keep taking the laces and pushing them down the opposite holes, just as you can see in the close up image. If your laces get twisted laces, simply untwist as you go. Repeat the lacing technique until you reach the top.
Step 4
a. To finish up, leave one eyelet at the top, then push the ends behind them. You can also, at this point, push the tongue of the converse out a bit more.
 Capthatt makes high-quality men’s clothing and men’s shoes. All of their products are handmade and of excellent quality. Use promo code capt7 to get a special 20% discount.
2. How To Diamond Lace Shoes Step By Step
This is also called the “Criss cross method” or the “diamond lace”. Not only does the diamond shoe lace style catch the eye, it holds the converse firmly in place.
This makes this method great for running or sports, or any time you need to really secure your converse high tops. By the way, these look great with jeans, for more on other great shoe/jeans check out the article on the best shoes to wear with jeans
Step 1
how to diamond lace shoes step by step
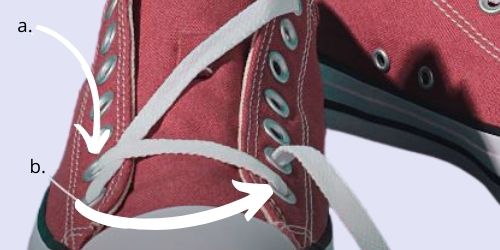
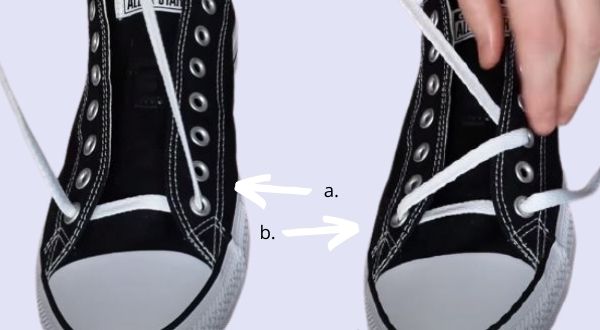
a. Take your lace through the bottom eyelets, in and out of them as in the image.
b. You’re then going to skip up to the third eyelet, and take your lace across and enter that hole
Step 2
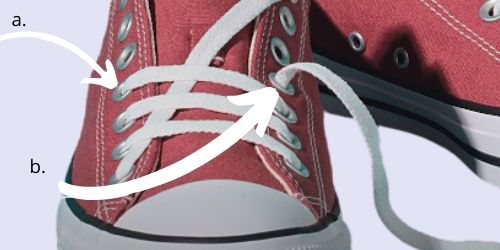
a Now pull the aglet under and up the next eyelet one above
b. Feed the lace aglet into the opposite eyelet one down. Just like in figure a, go up and under the next eyelet above.
c. Keep doing this until you reach the top
d. Now take the other lace and weave under and over the tied laces
Step 3
a after weaving under and over the existing tied laces, go over and into the eyelet two up
b. Now pull the aglet one eyelet up and weave under and over until arriving at the eyelet two down
Repeat steps a and b with each lace until you get to the top.
Step 4
a. when you get to the top, take the lace aglet and go under into the eyelet one below
b. weave under and through the top lace and into the top eyelet one up. Do the same for the other lace and you’re done!
3. How To Military Lace Your Shoes
As the name suggests, this type of shoe lacing style was mainly used for military shoes. This is because soldier shoes are made with rigid inflexible leather, so tight lacing patterns such as the criss cross or diamond would make the shoes uncomfortable to wear.
The beauty of this lacing method is it leaves parts of the shoe exposed, allowing the foot to move around more freely. Try it with your converse high tops on days when you’re going to do a lot of walking, that way you keep your feet as flexible as possible.
To tie your shoes with the army lacing pattern, follow this procedure:
Step 1
a Start by lacing straight across and then go under and not over
b. Run the laces up each side of the shoe by feeding lace into the second eyelets
Step 2
a. Cross back one lace under another and out of the second eyelet
b. Run the laces up each side and feed through the third eyelet (the next one up)
c. Repeat this by crossing back and running the laces up each side
Step 3
a. When you get to the top simply hide the laces behind the tongue of the shoe
l
4. Lightning Bolt Shoe Laces – Converses
This particular converse lacing is ideal for securely fastening shoes with long laces. Great to look at, the technique is called the lightening bolt because of the zig-zag lacing. While it may appear complicated, it is as fast as lightning to do.
.
Step 1
a. Tie a knot inside the top eyelet lace and cross diagonally over
b. Once pulled through the opposite bottom eyelet, feed the lace under then up through the next eyelet.
Step 2
a. Cross the shoe lace over and feed it through the eyelet
b. Now go under and out of the net eyelet
Step 3
a. Cross the lace back over and feed through
b. Do this again and get back to the other side
c. Repeat and tie at the top
5. Bar Lacing Shoes – Step By Step
Bar lacing (also known as straight lacing) is the most minimalist of all the lacing techniques and is so called because of the bold straight across effect the laces make. While it appears fairly straight forward, there’s a little more to this lace up design than meets the eye.
This look is great for any occasion, but is particularly useful when you want to relieve pressure on the upper part of the foot. It’s super comfortable and gives off a more casual and laid back vibe. This style of lacing is not recommended when using your converse high tops for sportswear.
Step 1

Want to lace converse your high tops loose? Try the bar lacing method
a. Tie a knot at the bottom eye let, then go straight across – not under.
Step 2
a. Inside the sneaker run the lace under and through the second eyelet
b Now cross the lace over to the opposite eyelet and inside the next eye under and through
Step 3
Repeat step 2 until you reach the top then
Step 4
Tie a knot and secure the lace inside the shoe.
6. How To Ladder Lace Converse
On to a new lacing technique; the ladder lacing method is so called because it looks somewhat like the rungs of a ladder, it’s also called “train track lacing”.
It’s a relatively easy lacing method to do, and the finished look is neat and attractive. As an everyday lacing technique this is fine, but if you want more ankle support, you’re better off going for the standard or criss cross lacing method.
Step 1
a. Start by going right through the eyelets through the bottom and not over the top
Step 2
a. Now run the lace straight up each side and then across
b. Do the same thing for the lace on the other side
Step 3
a. Take the aglet through the next eyelet up and across
b. Repeat the same process for the other lace.
Keep doing this until you reach the top and you’re done.
7. Lattice Lacing Style
We present the next method of lacing shoes, called “Lattice” lacing. Not only does this look good, but it offers a greater level of comfort. The upper part of the lattice shoe laces pattern leaves space at the front part of the foot (for flexibility) while maintaining enough shoe security.
Step 1
a. Start with the lacing running through the bottom and out through the eyelets in a straight line, as in the image
b. Now run the shoe lace into the opposite eyelet up by three
c. Pull the lace inside and go under and out through the next eyelet as per the image.
Step 2
a Go diagonally down three eyelets and again go inside and under through the next eyelet up
b. Again go diagonally up three, except this time the lace should come out of the top eyelet
Step 3
a From the bottom of the opposite end take the lace over and under. Then feed in through the eyelets that is 3 up
b. From this position feed the lace under the next eyelet up
c. Now weave through the other laces by going under then over then under again. Go into the next eyelet and back under the eyelet above then repeat the weave
d. End lattice weave with a knot of your choice
Bottom Line
Chances are, one of the above ways of lacing your converse high tops will end up being your “go to” lacing pattern. But, on the occasions when you want something different (or just want to show off a bit) then use this guide on “How to lace converse high tops” as your reference point.
As a side note, along with the lacing methods, add various colored laces, or thicker and thinner ones to enhance each design.


